前言
去年腾讯云服务器过期了,想着采用Hexo + GitHub Pages搭建一个新的博客,主题使用Fluid。
今年~~~~感觉以前搭建的未免有点过于花哨~~~~又想折腾了,于是使用Cactus重新搭建了一遍。
今年又改回来了\( ̄︶ ̄*))
这里记录一下自己去年使用Fluid搭建与魔改(照搬他人)blog的步骤,日后查找起来也方便。
搭建blog
准备工作
(1)需要有一个GitHub账号,没有可以去官网注册一个
(2)电脑安装Git,安装及使用教程参考Git教程
(3)由于Hexo是基于Node.js编写的,故电脑还需要安装Node.js,可以去官网进行下载
创建代码仓库
进入GitHub官网,创建一个新的代码仓库,仓库名格式必须为<用户名>.github.io。
安装Hexo
安装 Hexo
创建一个项目 hexo-blog 并初始化
1
2
3
| hexo init hexo-blog
cd hexo-blog
npm install
|
本地启动
此时我们打开浏览器访问http://localhost:4000即可进入默认风格网站
更换主题
我们可以通过Hexo官网获取自己喜欢的主题,这里以我使用的Fluid为例
安装主题
1
2
| cd hexo-blog
git clone https://github.com/fluid-dev/hexo-theme-fluid.git themes/Fluid
|
打开hexo-blog目录下的_config.yml 文件,对主题进行配置
1
2
| theme: fluid
language: zh-CN
|
创建「关于页」
首次使用主题的「关于页」需要手动创建:
创建成功后,编辑博客目录下 /source/about/index.md,添加 layout 属性。
修改后的文件格式:
1
2
3
4
5
6
| ---
title: about
date:
layout: about
---
正文
|
此时我们输入指令
1
2
3
| hexo clean
hexo g
hexo s
|
此时再去访问http://localhost:4000,我们的Fluid主题blog就搭建好了
创建文章
打开hexo-blog目录下的_config.yml 文件,对文章进行配置
执行如下命令创建一篇新文章
执行完成后打开source\_posts目录可以看到生成的test.md和test文件夹打开test.md即可对文章进行编辑
图片的插入可以参考官方文档,也可以使用图床,支持Markdown, HTML
Fluid配置
参考Hexo Fluid官方文档
上传至GitHub Pages
安装hexo-deployer-git
1
| npm install hexo-deployer-git
|
打开hexo-blog目录下的_config.yml 文件,进行配置
1
2
3
4
5
6
| deploy:
type: git
repo: 你的GitHub仓库地址
branch: main
token: 你的Personal access tokens
|
输入指令
此时blog完成上传GitHub Pages,浏览器访问 https://<用户名>.github.io,部署成功
绑定域名
购买域名
寻找合适的域名交易平台购买域名
域名解析
我是在Namesilo购买的域名,所以在这里以Namesilo为例
登陆后找到Active Domains,点击Manage,找到自己购买的域名,在Options中点击Manage DNS for this domain ,将原有的记录全部删除,添加两个新记录

(这里的记录值填自己blog的ip地址,不清楚可以去ping一下)
在博客目录 /source下创建一个名为CNAME的文件,在文件内写入你的域名(不要加https://和www.)
输入指令
Github解析
在Github的xxx.github.io项目,进入Settings,在Pages下的Custom domain功能中,将刚刚申请的域名写进去。
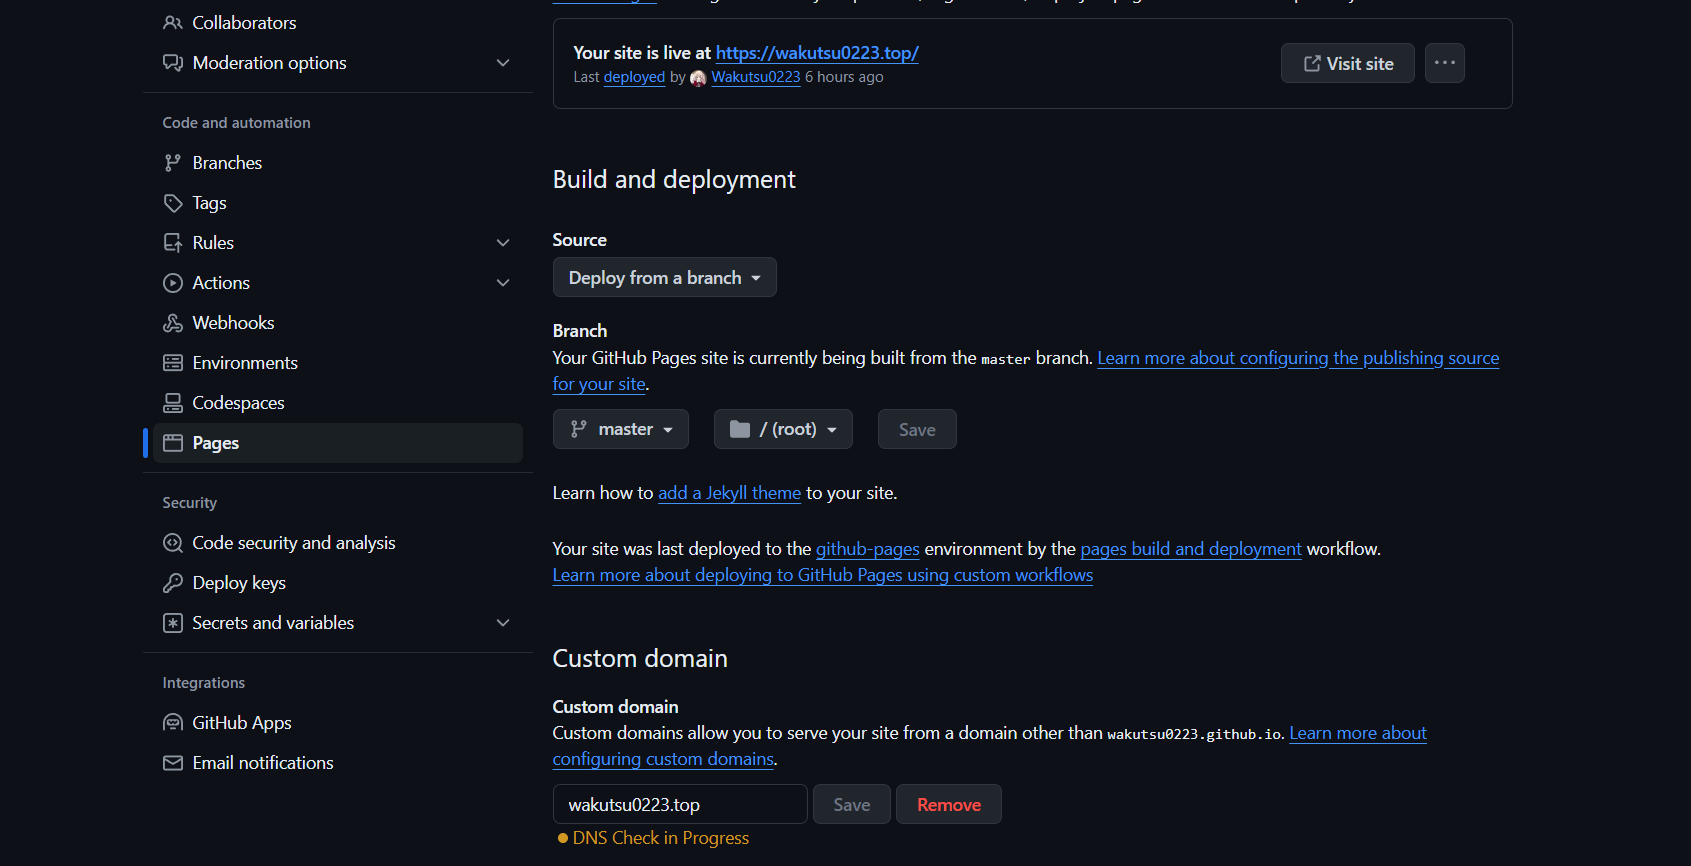
设置好后,等待一段时间后,就可以通过域名访问blog了
Fluid魔改
字体样式修改
修改字体样式直接引入css文件和字体包即可。
首先寻找自己喜欢的字体,这里推荐几个网站:第一字体网,字体天下,字体家
将需要使用的字体文件放入博客目录themes\fluid\source\css下
如有有css文件,就在最下面继续写;如果没有,则新建一个css文件,文件名任取
1
2
3
4
5
6
7
8
| @font-face{
font-family: 'ziti' ;
src: url('ziti.ttf');
}
body {
font-family: ziti,-apple-system, BlinkMacSystemFont, "Segoe UI", "Helvetica Neue", Lato, Roboto, "PingFang SC", "STZhongsong", "Lantinghei SC", sans-serif
}
|
鼠标样式修改
在css文件添加下方代码,然后引入即可。
1
2
3
4
5
6
7
8
9
10
11
|
body {
cursor: url(https://cdn.jsdelivr.net/gh/sviptzk/HexoStaticFile@latest/Hexo/img/default.cur),
default;
}
a,
img {
cursor: url(https://cdn.jsdelivr.net/gh/sviptzk/HexoStaticFile@latest/Hexo/img/pointer.cur),
default;
}
|
网站运行时间
打开\themes\fluid下的_config.yml,在主题配置中的 footer: content 添加:
1
2
3
4
5
6
7
8
9
10
| footer:
content: '
<a href="https://hexo.io" target="_blank" rel="nofollow noopener"><span>Hexo</span></a>
<i class="iconfont icon-love"></i>
<a href="https://github.com/fluid-dev/hexo-theme-fluid" target="_blank" rel="nofollow noopener"><span>Fluid</span></a>
<div style="font-size: 0.85rem">
<span id="timeDate">载入天数...</span>
<span id="times">载入时分秒...</span>
<script src="/js/duration.js"></script>
</div> '
|
在\themes\fluid\source\js目录下创建 duration.js,内容如下:
1
2
3
4
5
6
7
8
9
10
11
12
13
14
15
16
17
18
19
20
21
22
23
24
25
26
27
28
29
30
31
| !(function() {
var start = new Date("2022/10/15 00:00:00");
function update() {
var now = new Date();
now.setTime(now.getTime()+250);
days = (now - start) / 1000 / 60 / 60 / 24;
dnum = Math.floor(days);
hours = (now - start) / 1000 / 60 / 60 - (24 * dnum);
hnum = Math.floor(hours);
if(String(hnum).length === 1 ){
hnum = "0" + hnum;
}
minutes = (now - start) / 1000 /60 - (24 * 60 * dnum) - (60 * hnum);
mnum = Math.floor(minutes);
if(String(mnum).length === 1 ){
mnum = "0" + mnum;
}
seconds = (now - start) / 1000 - (24 * 60 * 60 * dnum) - (60 * 60 * hnum) - (60 * mnum);
snum = Math.round(seconds);
if(String(snum).length === 1 ){
snum = "0" + snum;
}
document.getElementById("timeDate").innerHTML = "本站居然运行了 "+dnum+" 天";
document.getElementById("times").innerHTML = hnum + " 小时 " + mnum + " 分 " + snum + " 秒";
}
update();
setInterval(update, 1000);
})();
|
添加自定义css和js文件
打开\themes\fluid下的_config.yml,在以下位置进行修改:
1
2
3
4
| custom_js:
- /js/duration.js
custom_css:
- /css/custom.css
|
看板娘
安装Live2D
在hexo-blog目录下右键打开Git Bash Here安装Live2D: npm uninstall hexo-helper-live2d
选择模型
原生模型:
- Epsilon2.1
- Gantzert_Felixander
- haru
- miku
- ni-j
- nico
- nietzche
- nipsilon
- nito
- shizuku
- tsumiki
- wanko
- z16
- hibiki
- koharu
- haruto
- Unitychan
- tororo
- hijiki
安装模型:
在hexo文件夹根下右键打开Git Bash Here键入npm install --save live2d-widget-模型名即可。
配置
打开hexo-blog目录下的_config.yml 文件,在末尾增加:
1
2
3
4
5
6
7
8
9
10
11
12
13
14
15
16
17
18
19
| live2d:
model:
scale: 1
hHeadPos: 0.5
vHeadPos: 0.618
use: live2d-widget-model-tororo
display:
superSample: 2
width: 120
height: 200
position: left
hOffset: 20
vOffset: 50
mobile:
show: true
scale: 0.5
react:
opacityDefault: 0.7
opacityOnHover: 0.2
|
接着输入命令
1
2
3
| hexo clean
hexo g
hexo s
|
我们就可以看到可爱的看板娘出现在了我们的blog里了
一言
打开\themes\fluid下的_config.yml,在以下位置进行修改:
1
2
3
4
5
6
7
8
9
10
| slogan:
enable: true
text: ""
api:
enable: true
url: "https://v1.hitokoto.cn/"
method: "GET"
headers: {}
keys: ['hitokoto']
|
雪花特效
在\themes\fluid\source\js目录下duration.js中添加:
1
2
3
4
5
6
7
8
9
10
11
12
13
14
15
16
17
18
19
20
21
22
23
24
25
26
27
28
29
30
31
32
33
34
35
36
37
38
39
40
41
42
43
44
45
46
47
48
49
50
51
52
53
54
55
56
57
58
59
60
61
62
63
64
65
66
67
68
69
70
71
72
73
74
75
76
77
78
79
80
81
82
83
84
85
86
87
88
89
90
91
92
93
94
95
96
97
98
99
100
101
102
103
104
105
106
107
108
109
110
111
112
113
114
115
116
117
118
119
120
121
122
123
124
125
126
127
|
function snowFall(snow) {
snow = snow || {};
this.maxFlake = snow.maxFlake || 200;
this.flakeSize = snow.flakeSize || 10;
this.fallSpeed = snow.fallSpeed || 1;
}
requestAnimationFrame = window.requestAnimationFrame ||
window.mozRequestAnimationFrame ||
window.webkitRequestAnimationFrame ||
window.msRequestAnimationFrame ||
window.oRequestAnimationFrame ||
function(callback) { setTimeout(callback, 1000 / 60); };
cancelAnimationFrame = window.cancelAnimationFrame ||
window.mozCancelAnimationFrame ||
window.webkitCancelAnimationFrame ||
window.msCancelAnimationFrame ||
window.oCancelAnimationFrame;
snowFall.prototype.start = function(){
snowCanvas.apply(this);
createFlakes.apply(this);
drawSnow.apply(this)
}
function snowCanvas() {
var snowcanvas = document.createElement("canvas");
snowcanvas.id = "snowfall";
snowcanvas.width = window.innerWidth;
snowcanvas.height = document.body.clientHeight;
snowcanvas.setAttribute("style", "position:absolute; top: 0; left: 0; z-index: 1; pointer-events: none;");
document.getElementsByTagName("body")[0].appendChild(snowcanvas);
this.canvas = snowcanvas;
this.ctx = snowcanvas.getContext("2d");
window.onresize = function() {
snowcanvas.width = window.innerWidth;
}
}
function flakeMove(canvasWidth, canvasHeight, flakeSize, fallSpeed) {
this.x = Math.floor(Math.random() * canvasWidth);
this.y = Math.floor(Math.random() * canvasHeight);
this.size = Math.random() * flakeSize + 2;
this.maxSize = flakeSize;
this.speed = Math.random() * 1 + fallSpeed;
this.fallSpeed = fallSpeed;
this.velY = this.speed;
this.velX = 0;
this.stepSize = Math.random() / 30;
this.step = 0
}
flakeMove.prototype.update = function() {
var x = this.x,
y = this.y;
this.velX *= 0.98;
if (this.velY <= this.speed) {
this.velY = this.speed
}
this.velX += Math.cos(this.step += .05) * this.stepSize;
this.y += this.velY;
this.x += this.velX;
if (this.x >= canvas.width || this.x <= 0 || this.y >= canvas.height || this.y <= 0) {
this.reset(canvas.width, canvas.height)
}
};
flakeMove.prototype.reset = function(width, height) {
this.x = Math.floor(Math.random() * width);
this.y = 0;
this.size = Math.random() * this.maxSize + 2;
this.speed = Math.random() * 1 + this.fallSpeed;
this.velY = this.speed;
this.velX = 0;
};
flakeMove.prototype.render = function(ctx) {
var snowFlake = ctx.createRadialGradient(this.x, this.y, 0, this.x, this.y, this.size);
snowFlake.addColorStop(0, "rgba(255, 255, 255, 0.9)");
snowFlake.addColorStop(.5, "rgba(255, 255, 255, 0.5)");
snowFlake.addColorStop(1, "rgba(255, 255, 255, 0)");
ctx.save();
ctx.fillStyle = snowFlake;
ctx.beginPath();
ctx.arc(this.x, this.y, this.size, 0, Math.PI * 2);
ctx.fill();
ctx.restore();
};
function createFlakes() {
var maxFlake = this.maxFlake,
flakes = this.flakes = [],
canvas = this.canvas;
for (var i = 0; i < maxFlake; i++) {
flakes.push(new flakeMove(canvas.width, canvas.height, this.flakeSize, this.fallSpeed))
}
}
function drawSnow() {
var maxFlake = this.maxFlake,
flakes = this.flakes;
ctx = this.ctx, canvas = this.canvas, that = this;
ctx.clearRect(0, 0, canvas.width, canvas.height);
for (var e = 0; e < maxFlake; e++) {
flakes[e].update();
flakes[e].render(ctx);
}
this.loop = requestAnimationFrame(function() {
drawSnow.apply(that);
});
}
var snow = new snowFall({maxFlake:60});
snow.start();
|
鼠标点击显示字体效果
在\themes\fluid\source\js目录下duration.js中添加:
1
2
3
4
5
6
7
8
9
10
11
12
13
14
15
16
17
18
19
20
21
22
23
24
25
26
27
28
29
30
31
32
33
| var a_idx = 0;
jQuery(document).ready(function($) {
$("body").click(function(e) {
var a = new Array
("TuT", "( ゚∀゚) ノ♡", "ヽ(`Д´)ノ", "(☍﹏⁰)", "( ´•̥ו̥` )", "ΩДΩ", "(・ω・)", "ヾ(´︶`*)ノ♬", "(❀╹◡╹)");
var $i = $("<span/>").text(a[a_idx]);
a_idx = (a_idx + 1) % a.length;
var x = e.pageX,
y = e.pageY;
$i.css({
"z-index": 5,
"top": y - 20,
"left": x,
"position": "absolute",
"font-weight": "bold",
"color": "#FF0000"
});
$("body").append($i);
$i.animate({
"top": y - 180,
"opacity": 0
},
3000,
function() {
$i.remove();
});
});
setTimeout('delay()', 2000);
});
function delay() {
$(".buryit").removeAttr("onclick");
}
|
在 \themes\hexo-theme-spfk\layout\layout.ejs 末尾添加以下代码:
1
2
|
<script type="text/javascript" src="/js/click_show_text.js"></script>
|
网页标题恶搞
在\themes\fluid\source\js目录下duration.js中添加:
1
2
3
4
5
6
7
8
9
10
11
12
13
14
15
16
17
| <!--浏览器搞笑标题-->
var OriginTitle = document.title;
var titleTime;
document.addEventListener('visibilitychange', function () {
if (document.hidden) {
$('[rel="icon"]').attr('href', "/img/fluid.png");
document.title = '看不到我~';
clearTimeout(titleTime);
}
else {
$('[rel="icon"]').attr('href', "/img/1.png");
document.title = '欢迎回来~' + OriginTitle;
titleTime = setTimeout(function () {
document.title = OriginTitle;
}, 2000);
}
});
|
在\Hexo\themes\hexo-theme-spfk\layout\layout.ejs中添加如下代码:
1
2
|
<script type="text/javascript" src="\js\FunnyTitle.js"></script>
|
背景添加动态线条效果
在\Hexo\themes\hexo-theme-spfk\layout\layout.ejs中添加如下代码:
1
2
3
4
|
<script type="text/javascript"
color="220,220,220" opacity='0.7' zIndex="-2" count="200" src="//cdn.bootcss.com/canvas-nest.js/1.0.0/canvas-nest.min.js">
</script>
|
大概就这些,emmm,总感觉自己的blog并不是用来写博客的,而是用来折腾的。